July:
For the month of July I originally planned to create a beach scene with beach ball and bucket. This would be to illustrate summer.
Sand:
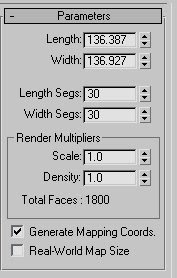
First, I selected a “Plane” from the “Standard Primitives”, created a plane and increased the number of “Length” and “Width” segments on the plane (Shown below).
After increasing the number of segments on the plane I went to the “Modifier List”, scrolled down and selected “Editable Poly”.
Next, to create the desired effect of sand I changed the “Selection Region” from “Rectangular” to “Circular”. I then began modifying the plane to look more like a sandy beach. Before I modified the plane by using “Editable Poly’s, I decided to change the texture of the plane. I had two ideas for the texture of a sandy beach.
Idea 1:
The first Idea I had included going into 'Material Editor', like I did with the snow scene I did previously, select a 'Noise Map' and change the colour to yellow. This is because, like snow, I feel that it would represent the look of sand quite nicely.
Idea 2:
My second Idea also included going into 'Material Editor’ and select a 'Noise M ap' but this time I added a bitmap image as a material. The image I used I got off of 'Google Search’. This is because, like snow, I feel that it would represent the look of sand quite nicely.
I eventually decided to go with ‘Idea 2’. This is because I feel that the bitmap image better portrays the image of sand than just a normal noise texture coloured a sandy yellow colour.
Also, in addition to the bitmap, I changed the ‘Bump Amount’ in the ‘Map’ section of the ‘Material Editor’ to 100.
You can see what the basic sand rendering will look like with this new sand texture implemented just below.
Beach Ball:
The Beach Ball was quite simple to do. I started by creating a ‘Sphere’ from the ‘Standard Primitives’ list. I next went into the ‘Material Editor’ and applied a bitmap image from the ‘Materials’ folder of a striped pattern bitmap which I created previously in Photoshop by using a tutorial.
After creating the beach ball, manoeuvred it into position onto the sand plane.
Ocean and Background:
Background:
This part of the summer setting proved to be troublesome. I couldn’t decide how to implement the background. I wanted to do something different than the snow scene I did previously.
I started off by creating a vertical plane; this would be placed behind the Ocean and Sand planes when the scene is finished (shown below).
Next, I took a beach image off of the internet for use as a background image and edited it slightly in Photoshop. (The edited image is shown below).
(Notice that I removed the beach and sea because I’m going to add my own 3D beach and sea later.)
I then applied this beach image to the vertical background plane. I did this by selecting ‘Material Editor’ going into the browser and selecting ‘Bitmap.
I chose the beach image file ‘Barbados_beach_2.jpg’ and applied the image to the vertical plane, ‘plane 2’.
After having applied the beach image to the vertical plane (‘plane 2’), I positioned the plane behind the ‘Ocean’ and ‘Sand’ planes (planes 3 and 2). Below is an image of progress.
Ocean:
The ocean was possibly the most challenging element of all 3 scenes. I created a third, unmodified, plane to represent the ocean.
To recreate the look and feel of water I turned to the help of my tutor who suggested I apply a mirrored texture to the water.
So, I went into material editor and applied the Barbados Beach, which I used before on the background plane, as the defuse colour of the water to get a good mirrored effect on the water.
After that, I applied a ‘Wave’ texture to the ocean plane, set the opacity of the waves to 100 and added a ‘Bump’ texture map amount of 30 to get a more realistic look of waves.
Below is the finished July Summer scene with the beach ball added to the sandy beach.


No comments:
Post a Comment